Sunday, March 20, 2016

Film Making

Film has been considered a high art form for quite a long time, but how can it be included in an art classroom?  The answer is simple, have the students make a short film.  However, depending on the class and the budget of the school, it may not be that easy.

Example Lesson 1

For starts, the class must be given a lesson on the history of film making.  Covering everything from it's invention to it's use in today's world.  In order for the students to make a short film that explores the artistic elements of film making, they would have to know how this is achieved and why.  This is where I would include a lesson on the vocabulary of film making.  I would show them film clips and screenshots that emphasize the different camera angles, movements, and shots.  The students would also be quizzed on this information and asked how to use these techniques to emphasize an idea or emotion.  Now the students should be ready to start making film of their own.

The students will be expected to make a short film that will tell an emotional story.  The story can be about anger, love, sadness, etc.  The story should revolve around only one of these emotions.  They will be put into groups and each member will be given the chance to film, cast, and edit.  The story will be written by the students and they will be given guidance to ensure that they are along the right path.  Using the different techniques that they were quizzed on, they will be expected to use these to show the emotions in their story.

Example Lesson 2

Another possibility, if there was not enough time to include a full blown film making lesson, would be for the students to make screenshots.  Given the same lesson as above pertaining to the history and techniques of film making, the students will work in groups and create several screenshots that show an emotion or action in a setting, using a digital camera and Photoshop to edit these images.

Saturday, March 12, 2016

Special Needs and the Gifted and Talented

When teaching in the public school system, you have to expect encountering students with varying levels of skill and ability.  This doesn't mean that you have to create different lessons for different groups of students, only that you will have to expect different outcomes.  These different outcomes will be graded according to the student's ability, and the lesson can be modified so that the student isn't working above or below their skill level.

Special Needs

The first group of students that we will discuss today is the special needs group.  Depending on the student, whether they have difficulty with motor skills or difficulty understanding concepts, the lesson can be tailored to their needs so that they will learn the most possible.  This, unfortunately, causes that student to be singled out.  This becomes an even larger problem when there are more than one students with special needs, and it becomes a group that is being separated out.  The best way that I see to counteract this is to not tell the student that they will be held to a different level when the assignment will be graded and allow the student to work on the project in the same manner as the rest of the class.

A great project to use in this manner with students with special needs is a still life drawing.  All of the students will be drawing from the same subject that will be placed in the center of the room.  The students will be given a choice where to sit, so that they will feel comfortable drawing what they can see from the angle they choose.  Along with that, they will not be expected to draw everything that they see, they will be asked to draw a smaller area of the still life.  This will further allow them to draw something that they are all comfortable with.

As far as materials go, they will all be drawing with graphite pencils on white drawing paper.  This lesson can even include some scratch drawing where the students can experiment with different papers and drawing materials to not only learn about different materials, but also do it without the pressure of it being graded.

Grading the work of students with special needs is difficult to talk about hypothetically because each student is unique, and will be graded based on their particular skills and abilities.  Generally speaking, however, students who have motor skill difficulties will not be graded on technical skill the same as other students, and students with difficulty understanding concepts will not be graded poorly for not understanding the goals of the project.

Gifted and Talented Students

For this group the assignment will be drawn in the same manner as above but can be extended to work on a larger portion of the subject, and can even include using different materials and papers.  Their technical ability will be graded at a higher level than the rest of the class and these students can be talked to individually and the teacher can encourage the student to use some compositional strategies as well.

The subject in the center of the room will include some glass objects and some chrome or glossy objects where these students will be encouraged to draw reflections and also focus on some transparent pieces.  It will be up to the teacher to talk with these students before the class decides on their seating and how they view the subject so that the teacher can ask them to challenge themselves and work on the more challenging objects.


This also creates another group that is singled out from the rest of the class and can discourage those who are not as skilled.  One way to avoid discouraging the other students would be to have the gifted and talented group work on an extra assignment that they can work on at home.  Have these students draw a still life at home using a toned paper or have them draw challenging objects as a separate drawing that will be an addition to what the rest of the class is doing.


When dealing with multiple skill levels, it is difficult to avoid singling out students and discouraging others, but these are some easy and effective ways to counteract these issues.  It is always best to challenge your students, no matter what skill level, so that they learn as much as possible.  It is also always best to not hold their level of skill against them when grading their work.  The most important thing is that all of the students are learning at their own pace, and that they are all comfortable doing so.

Friday, March 4, 2016

Media in the Classroom

In today's world, the term media covers a lot of ground.  In the art classroom, the term can be narrowed down to several different forms of art making.  I have seen schools where there is only one art teacher, and this teacher has to include some types of media art into their curriculum.  I have also seen schools where there are several art teachers, each focusing on one or two types of art making.  Typically, when there are multiple teachers, one teacher is set aside solely for the media arts.  He or she will teach digital photography, animation, video/movie making, etc., and the students at the school will rotate between teachers throughout the school year.

I am ready to be a part of a school where I am part of a group of art teachers.  However, I wouldn't consider myself prepared just yet to be a single art teacher who teaches everything that the standards require.  In this blog, I will be discussing several projects that I have seen, or designed myself, that can be used as media arts lessons.

When it comes to media arts, there are several computer programs that are necessary to have; the first being Adobe Photoshop.  I can imagine that most of my students will have experience using this program at some point in their lives, and they will likely feel comfortable using it in the classroom.  Another program that I am familiar with is Adobe iMovie, this is a great and easy to use program that just about anybody can use to create a movie or short film.

Some Project Ideas

Using a digital camera, or cell phone (not preferred), and a tripod, the student will place the camera in a single point and will not move it at all.  The student will take several photos of themselves posing in front of the camera in several positions.  In Adobe Photoshop, the images can be layered so that the student will appear in all of these positions in one picture.

This is a great way to get the students to learn the basics of using Photoshop, or any kind of photo editing software.  It can be more about the different poses as well, compositional strategies can be used here, and the students can even try to tell a narrative with their images.

Online Example

Online Example

Another project that I have seen before is for the students to make a stop animation film using various techniques.  They can use modeling clay, wire sculpture, cartoon/photograph cutouts, etc.  Anything that can be easily and efficiently manipulated between frames.  This project works very well with iMovie.  They can include music, sound effects, and learn the basics of cutting and transitioning.


My Class

Depending upon the situation of the school, whether there are several specialized art teachers or one, these projects and many others can be included into the curriculum.  If I were to be the only art teacher, I would most certainly include these projects, or ones similar.  My media arts background isn't as in depth as some other's, but I am always willing to learn about different technology so that my students will learn as much as possible.

Even if I was a part of a team of teachers, I would still include media art lessons in my curriculum.  These lessons would likely include different mediums and would be combined with media arts to create a sort of hybrid lesson.

Tuesday, March 1, 2016

Photojournalism Techniques

Below are some photographs that I took to display several compositional and photojournalism techniques.  These photographs were taken with my smartphone as I was around town and one was even taken in Charleston, SC.  Besides the simple techniques, such as, Rule of Thirds, Golden Triangle, and Golden Spiral, these photojournalism techniques focus on making the image tell a story or to put the viewer inside the photograph.

Disturbance

This technique tries to put the viewer within the photograph by placing a frame within a frame, which, in this case, places the viewer inside of the room.  The point of this is to make the viewer feel as if they are experiencing one environment while viewing another.

Place

Place is another technique that puts the viewer into the photograph.  In this case, the subject is the room, but another subject is the table in which the photographer appears to be sitting.  By doing this, the viewer gets a stronger sense of perspective and can feel how large or small the room is.  This technique is used quite often in photojournalism for it's way of letting the viewer experience what the photographer experienced at the time of taking the photograph.

Proximity

Proximity is used most often with portraiture, but can be used with inanimate objects as well.  The purpose of this technique is to reach a level of intimacy with the subject.  The viewer will be forced to notice the subject and examine it, more so than the rest of the image.  This technique is a powerful tool when photographing faces for it's effectiveness is showing emotion.

Vantage Point

This technique is achieved by placing the camera in a place where your eyes would not normally go.  Disturbance and Place are commonly used at eye level, whereas with vantage point the viewer views the subject from an angle that they likely have never experienced before.  This can make the subject appear larger than life, or even distorted.

In The Classroom

Most students today will likely own a smartphone, and it will likely have a sophisticated camera.  Chances are, they are decently skilled with their device, and are capable of taking some good quality photographs.

This photography assignment will include the students taking photographs with their phones, and they will have to take shots using the 4 techniques described earlier.  This will be a good starting point, so that the students will feel comfortable using their device and will be able to think more about the composition of the image instead of worrying about how to properly use the camera.

Once the students have taken the 4 four photographs, and each image successfully exemplifies the techniques above, it is now time to have them use a different camera.  The cameras can be ones that the students already own, preferably digital, or if a student does not own a camera, the school, depending on the budget, can assign one for that student to rent.  However, another option would be disposable digital cameras.  Unfortunately, the disposable cameras will not have the option to edit and crop the image on the device, like a smartphone or a digital camera would.  This, however, is useful to the student, because they will have to focus on the composition and take the shot by placing the camera exactly where it needs to be, unlike with a smartphone where the image can be edited immediately after.

The Subject Matter

The students will need to think carefully about their subject and how to incorporate these techniques to abstract or tell something about their subject.  Teenagers usually are passionate about technology, music, and fashion.  Subjects could include cell phones, articles of clothing, music playing devices, etc.  These would likely be subjects for the techniques proximity and vantage point.

As for place and disturbance the students could take photographs of the things that they do with their family and friends.  The environment should be used to the photographer's advantage.


Example of Proximity

Example of Vantage Point

Example of Place

Example of Disturbance

Here are some websites that the students can read to learn how to achieve certain goals in their photography endeavors.

  • www.diyphotography.net
  • www.thephotoargus.com
  • digital-photography-school.com


Tuesday, February 23, 2016

Teacher Letter

Dear parents,

I am pleased that your child/children have expressed interest to attend my art class.  Here my students  will learn much more about how to create and understand art.  Through the art making process, students will learn how to think critically, problem solve, express themselves, and to think creatively.  These skills will take them farther in their curriculum outside of the art classroom, and will enable them to succeed.

The goals of my classroom are to encourage my students to express themselves effectively through visual and verbal means while building a foundation of art knowledge, vocabulary, and skills through the Elements of Art and Principles of Design.  The students will also learn how to use these skills to observe and understand the world around them.

Their work will be exhibited every year at our student art show, where they will win awards and will be able to discuss their work with other students, faculty, and parents.  My students will also be encouraged to display their work at public galleries, functions, and even the State Fair.  I will personally compile a group of works to display at these venues as well, given the permission of the student and their parents.

Each lesson taught in my class will consist of a history lesson about a particular artist or movement.  The students will be able to identify works of art from moments in history and from famous artists all around the world.  They will also be given the opportunity to view historical and meaningful works of art from field trips to the local art museum.

I look forward to working with you and your children, and if you have any questions or concerns, you can contact me through the attached email address.

It's going to be a great year!

Sincerely,
Mr. Grant Erd

Color Theory

The basics of color theory for most of us, are learned from a young age.  We are told what the primary colors are, what the secondary colors are, and sometimes we might even learn the tertiary colors.  Basically, we learn how the color wheel is structured.  Once we reach high school we learn so much more, and even more in college.

When teaching color theory to students below the college level, there are many things that they probably won't understand.  But, to keep things moving in the classroom, the students can use their teachings to create a work of art that teaches them how to properly mix colors.  They can make their own color wheel using the primary colors, red, green, and blue.


Once they have completed their color wheel, they can then move on to the project.

The Project

Using a camera and Photoshop, the teacher will take portraits of each student, change them to black and white, and then use posterize to minimize the tone range.  Using a grid, the students will map out the shapes of color and enlarge them onto a larger piece of paper.  They will then use tempera or acrylic paint to blend a single color, of their choice, with white to create a monochromatic self portrait.


(work in progress)

The students will also have the option to use more than one color.  They can use complimentary colors, tertiary colors, or even polychromatic for those who are more advanced.  To achieve this the students must understand how to properly place color into the highlights and shadows.  Placement of warm and cool colors is an option.  The warm colors for the highlights, and the cool for the shadows.


Andy Warhol

This is a great artist to talk about when teaching this lesson.  He used the silkscreen printing process to achieve beautiful color combinations.  He's most famous for his portraits of celebrities, especially Marilyn Monroe.

Tuesday, February 16, 2016

Color Pencil

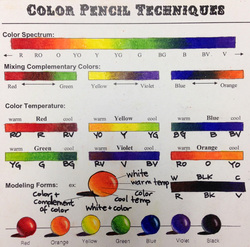
After drawing with graphite pencils for quite a while, it's time to move on to color pencil.  Shading with graphite and charcoal is very different from shading with color pencil.  With black and white, the shading is solely on the shapes of light and shadow, whereas with color pencil it's more about blending.

The students are going to need some practice with their materials before diving straight into creating a finished piece.  The most important thing to practice will be how to properly blend and lay down color.  With graphite pencil it's best to use a light touch when making contact with the paper, the same is true with color pencils, but even lighter.

The students will be expected to finish a worksheet where they will practice coloring and blending.  This worksheet should be started in class, with teacher input, and finished at home so that they will have plenty of time to practice.

Online Example

The lightness of pressure should be stressed as it is very easy to show the direction of your stroke with color pencils.  In our class, the worksheet was much smaller and less involved because of our time constraints.

In-class Example

The Project

There are many projects that can be done with color pencil.  Monochromatic or polychromatic portraits, abstract drawings, worm vs. cool color studies, etc.  Still life is another great project that would be easy to pull off in a classroom, especially since the students have already finished a still life drawing with graphite.  Working with color on the same project would allow them to practice what they already know, but with a different medium.

This still life however, should have at least one or two clear glass vases.  Since there is nothing to shade on a glass vase, the students will be forced to focus on shapes of color and their varying tints.  Some spheres or even spherical fruit should be incorporated as well.  This will allow them to focus again on light, shadow, and reflected light all over again, but this time with varying tints of color.

Online Example - Sari Gaby

Veronica Winters

Here are some student works that were shown in our class of different projects that can be done with color pencil.